Monday, January 31, 2011

A Blog Award!

 
I received a lovely Blog Award from Shaz of Cards Calligraphy-Shaz on Oz who not only loves her Cuttlebug and makes beautiful cards, but is also a Calligrapher - and her Calligraphy projects are just amazing.  Please take the time to check out Shaz's Blog - you'll be so glad you did!  Thanks Shaz :-)  In case you are wondering what "Liebster" means - it is German for "dearest".


 The conditions of this Award are:

You have been TAGGED and want to participate?
Then create a post where you post the 'LOVE BLOG' image.

You should also blog the persons link that gave you the award and inform her/him that you accept the award.

You can then choose 3 - 5 favourite blogs which you also link in your post, then each blogger will inform you that they have been tagged.

The aim of this action is that we bring unknown, good blogs to light, so I would ask you not to blog fellow bloggers that already have 3,000 followers.  


Well, there are so many Blogs out there - it is so hard to choose - but I am awarding this Blog Award to (drum roll please.......):

Karen Thomas from her Blog:  Luv to Stamp   Karen lives in Mackay, Queensland

Debi Finger from her Blog:  Debi's Crazy Life  Debi lives in New York, USA

Tammy Herschberger from her Blog:  Stamp Happy  Tammy is from the USA

Of course, I realise that everyone is very busy and may not have the time to link other blogs, so please just accept this Blog Award with lots of {{hugs}} and to let you know how much I enjoy your Blog :-)

Thanks again Shaz for my Award - I really appreciate it :-)

Jocelyn

Saturday, January 29, 2011

Wedding Cards using LOTS of embossing folders!


Hi and thanks for stopping by!  Sorry I haven't blogged for a little while - some frustrating computer issues plus being school holidays here in Australia, I've been out and about quite alot (been to the beach - yay!) and had no uninterrupted "me" time.

Anyway..........I have been playing with my embossing folders as the Challenge #4 over at CropStop is  "Make a Good Impression" where you have to use 2 different patterns as embossing on your project.  I had had my eye on the Splitcoaststampers 'Free for All' F4A47 Challenge  of "Texturize me!" from about 2 weeks ago and you had to use 2 different embossing folders for a card for that challenge - but I never got a chance to play.  Thought it was a cool idea though (you know how much I LOVE my Cuttlebug!!).


ETA:  I just learned that the above card was picked as one of the Cream of the Crop cards from the challenge over at Crop Stop - and I get a special blinkie to add to my Blog.  How lovely!!  Thanks Crop Stop!  Woo Hoo!!


So while I was at it, I decided to combine it with the SCS Clean and Simple Challenge CAS103 of "Flourishes" and pop these cards into the SCS Fan Club January Challenge of "Love".  I can't give you any more details about the Fan Club Challenge as you have to be (paid) Fan Club Member of SCS - I am only allowed to reveal the "theme". 

For the card above, I embossed 2 separate pieces of cardstock:  one with the hearts embossing folder and the other with the Budding Vine folder (note I did have to run the hearts-embossed cardstock through my Cuttlebug twice so I could get the pattern on the cardstock to the width I wanted - I hope that makes sense!!).  I then trimmed the 2 pieces of cardstock down so that when I put them together, the hearts-embossed cardstock was about half the height of the Budding Vine-embossed cardstock - there was a slight overlay so that I could tape them together easily at the back.   To hide the join at the front, I glued a piece of white lace over the top.  That piece of lace is old shop stock from a Haberdashery business my parents ran in the 1970's - so is over 30 years old!  The embossed panels are up on foam tape so there is a bit of height between them and the cardstock base.

Then, because the CAS Challenge was "Flourishes", I decided to stamp the sentiment onto one of my Spellbinder Fancy Tags die (I thought it looked pretty "flourishy" to me!), and then diecut the 2 Vintage corners from my Vintage Die set as some "bonus" flourishes and popped all of these up on mounts.  After I stuck the Vintage corners on, I then thought maybe it looked "too much", but they ain't comin' off now 'cos it will rip the cardstock!  Oh well!  I punched a heart from some glittery red cardstock which I bought when I went to Bright on holidays last year - cool stuff if you can get it as the glitter is very well adhered and doesn't come off and make a glittery mess!! 

And here is the 2nd version which is also for the Fan Club Challenge:


For this version, I used the Lace Doily edge punch instead of the piece of lace, and added 2 ribbons:  the black/gold one with the red-sequin one over the top.  I also used 2 different embossing folders:  Textile and Swiss Dots, and added the black cardstock layer on the top of the white base.  I omitted the Vintage die corners as it just looked "too busy".  Note sure if you can see, but there is a Scor-Pal line above the punched border which made it easier to butt it up underneath the Textile embossing so as it would be straight.  Here is a close-up piccy of the 2 ribbons - the red sequined and gold/black ribbon is true to life as to what the colours are - the main photo doesn't show it very well :-(  I can tell you that it was sooooooo hard to take photos of (both) the cards to try and capture the red sparkle but not have the embossing look all washed out.


So there it is.  Go and have a play with your embossing folders and see what different combinations you can come up with - and then try adding in some different punched borders or lace or ribbon.   Once I worked out the design and what embossing folders I liked together, the cards were very quick to make.

Thanks again for visiting!

Jocelyn


Card Recipe:  

Card #1:

Stamps:  Sentiment from Stamp-It Australia set siset014 self-cling rubber (this is a large set of 13 different sentiments)

Ink:  Stazon Jet Black

Accessories:  Cuttlebug, Craft Concepts Budding Vine embossing folder, Hearts embossing folder from Cuttlebug emboss and die set "Love Language", Spellbinder Shapeabilities S4-235 Fancy Tags, Cuttlebug Vintage die set - fancy corner, white cotton lace, 1mm mounts (dimensionals), foam tape, cardstock:  white, red glittery

Punches:  Carl CP-8 heart duo, Stampin' Up corner

Card #2:

Stamps and Ink:  as above

Accessories:  Cuttlebug, Textile and Swiss dots embossing folders, Spellbinder Shapeabilities S4-235 Fancy Tags, 1mm mounts (dimensionals), Scor-Pal, Ribbon: gold/black, red sequin, cardstock: white, black, red glittery

Punches:  Carl CP-8 heart duo, Stampin' Up corner, Martha Stewart Lace Doily edge


Thursday, January 20, 2011

Stampendous Party Balloons and Nellie Snellen border set MFD-023


Hi and thanks for stopping by :-)

I made a clean and simple boy's birthday card - well, I actually made this card twice!!  I had finished colouring up my image, then proceeded to ink up my sentiment with the black ink pad, but somehow dropped the ink pad on top of my image.  Oops :-(   Do you think I was grumpy??!!  So, it was back to the drawing board........  At least, it was a quick and easy image to colour - if it had been something very detailed, my head may have exploded!!  Note to self:  add sentiment before colouring images!!  Anyhow......

I used the Splitcoaststampers Inspiration Challenge IC266 - the Stephen Joseph Gifts website - as the basis for my colours from this particular item on the website.  I really loved the colours and the circles reminded me of balloons and my circles border die.

I am also playing the Splitcoaststampers Fan Club January Challenge - but as the Challenge is only open to Fan Club Members (ie: you have paid to join the SCS Fan Club), part of the rules is that you are not allowed discuss the Challenge Themes and details outside the Fan Club  - which is not to exclude you (my Blogging friends), but merely following the rules.  I joined a few months ago so I could put something back into the website which I love so much!! 

I coloured the image with Derwent Coloursoft and Prismacolor pencils + OMS.  I added some fine crystal glitter to the highlights on the balloons, plus the coloured dots around the strings.  I decided to underline the sentiment with my red and yellow pencils because it seemed a little "lost" and I wanted to draw your eye to it.

Here is a close-up piccy of the balloons:


The gorgeous blue border was diecut with my Cuttlebug and one of the border dies from my NEW Nellie Snellen border set MFD-023.  You use the same sandwich as for Spellbinder Nestabilities.  I love this particular die - it is so suited to masculine cards, so I can see myself using it alot.  This particular set is not on Fat Cat's Card Corner's website at the moment, but I'm sure it will be very soon.  You can find all their other Nellie Snellen dies at this link here.  Note that I was careful to attach the border evenly so that the edges matched.  You can always trim down the sides of your card to even things up.

I added a Scor-Pal line above the border - I often do this to just "finish" the edge before I attach it to the rest of a card.  Lastly, I corner-punched the top corners of the white cardstock.  I thought about adding a ribbon, but in the end decided to keep things simple.

And here is my stepped up version:


I stamped the image twice, then cut out just the balloons and popped them up on mounts (dimensionals).  I used various sizes of mounts so the red balloon is the lowest in height and the blue balloon is the highest.   After diecutting the blue border and adding the Scor-Pal line, I ran the blue cardstock through my Cuttlebug using my Swiss dots embossing folder.  The ribbon was attached in 2 separate elements and the bow itself was made with my Bow Easy.  Here is a close-up piccy so you can see the dimension of the balloons:


Thanks again for stopping by!  

Jocelyn


ETA:  In response to Shaz's question: I use Google Picasa (free download from the Internet) to add my details on my photos. 


Card Recipe:

Stamps:  Stampendous 'Party Balloons' CRY008 cling rubber, Sentiment from Penny Black 'It's your day' 30-046 clear set

Ink:  Memento Tuxedo black

Accessories:  Cuttlebug, Nellie Snellen Border-2 MFD023 die set, Swiss dots embossing folder, mounts (dimensionals), Derwent Coloursoft + Prismacolor pencils, paper stumps, Odourless Mineral Spirits, Scor-Pal, Bow Easy, ribbon, fine crystal glitter, Designer Dries Clear adhesive (for glitter), cardstock:  sky blue, KW Doggett Knight white

Punches:  Stampin' Up corner punch

Friday, January 14, 2011

CAS Birthday card using Craft Concepts Budding Vine embossing folder


Hi and welcome to my Blog :-)

My BIL's sister recently turned 70 and this is the quick and simple birthday card I made for her.   The beautiful embossing folder is called Budding Vine" by Craft Concepts - I really LOVE this folder - one of my favs - but honestly, if you didn't have this folder, you could use lots of other ones, eg: Craft Concepts Cottage Floral, Cuttlebug Textile or Jamara etc, Crafts Too Damask, or there are some lovely similar ones by other manufacturers.

Once I embossed the pink cardstock, I then cut the pink cardstock card base to size.  I have found by experience, particularly when you use a folder that is very detailed, that it "shrinks" the cardstock, so that if you had it just the right size for your base, it won't be anymore!!   I popped the embossed panel up on foam tape as I wanted a little bit of dimension.

I added the ribbon in 2 separate elements and the bow itself was made with my Bow Easy which are now in stock at Fat Cat's Card Corner.  The sentiment panel was diecut with my Oval Nesties, and the sentiment itself was stamped with Dusty Plum pigment ink and heat-embossed with Satin Pearl clear embossing powder which I really love for my heat-embossing - it doesn't turned out as "shiny or glossy" as regular clear embossing powder.  I ran my ink pad around the edges of the panel and popped the panel up on 2mm mounts (dimensionals).

Lastly, I added the 3 pink rhinestones.

I do not know who made the sentiment - it has a number on it, but no Company name.  I tried Googling it, but came up with nothing - I suspect it might be an Australian stamp manufacturer - it's been in my stash since dinosaurs roamed the earth - I forgot I had it, but I love how "swirly" it is and ties in with the Budding Vine embossing folder!   If you do know the stamp manufacturer, please leave me a comment and I will update my post.

And here is the same card which uses Bazzill Bling "Icy Teal" cardstock (not sure of the actual cardstock name - it's just what I call it!).  And of course, I changed the pearls on the sentiment panel to Bliss SB718 and the ink I used for the sentiment was Versacolor Laurel Leaf pigment.  I made this card for my sister-in-laws 60th birthday.  The Bazzill Bling cardstock looks so sparkly IRL - but I think you can see some of the "sparkle" from the photo.


Thanks again for stopping by!

Jocelyn


Card #1 Recipe:

Stamps:  Best Wishes E238 (unknown brand name)

Ink:  Colorbox Dusty Plum pigment

Accessories:  Cuttlebug, Spellbinder Oval Nestabilities, Craft Concepts Budding Vine embossing folder, Bow Easy, pink organza ribbon, satin pearl clear embossing powder, heat-gun, foam tape, 2mm mounts, Kaiser pink rhinestones SB701, cardstock: pink, white

Monday, January 10, 2011

Stampendous Star Lilies + Nellie Snellen Multiframes and border dies!


Hello Blogging friends!  I made a Mother's Day card using a fabulous sketch from Taylor Von Bruggen of Taylored Expressions (USA) from way back on June 11, 2010:  Sketch Challenge #117.  I am a big fan of Taylor's Sketches and a few days ago, downloaded her 2 x Sketch Books which are on the RHS of her Blog listed under the Baker's Dozen Design Team members.  It is a PDF file so you will need Acrobat Reader (free download from the Web) to open it.  I have a folder with Sketches which I love to look through when my mojo has gone missing or I just need some inspiration.  THANKS Taylor!!

Anyway, onto the card.  The stamp is a beautiful NEW stamp by Stampendous called "Star Lily" and was coloured with Derwent Coloursoft and Prismacolor pencils + OMS.  It was really easy to colour as I just coloured the centres of each petal and left the white as highlight.  I added a tiny bit of pink here and there on the leaves and stems which was something I learnt from my Decorative Painting teacher many years ago.  If you add some of your flower colour to leaves, it really "lifts" the whole picture.  I didn't draw on the colour with my pencils: I just used my paper stump that already had the pink colour on it + OMS, and just "smudged" it on.  I lightly coloured around the image with blue chalk.

I decided to add some fun flock to the pollen on the stamens.  At first, I added some glitter, but it didn't look right, so I scraped it off and went with the flock instead.   Here is a close-up piccy:


The rosepink punched border was made with one of my NEW Nellie Snellen border dies - you get 2 in a pack.  Isn't it pretty?!!  You use the same sandwich in your Cuttlebug as for Spellbinder Nesties: A plate, C plate, die, cardstock, B plate.  This particular set of border dies is not listed on Fat Cat Card Corner's website at the moment, but will be soon (although there is another border set there).  I added a Scor-Pal line just above the punched border (bit hard to see in the photo).

I ran the designer paper through my Cuttlebug using my Jamara embossing folder just because I LOVE texture - but really any folder of a similar nature would work equally as well.  The ribbon was attached in 2 separate elements, and the bow itself was made with my Bow Easy.

I added the tiny punched hearts which are the leftover punchies from using Arrows border punch (you know how much I love these little hearts LOL!!)

And here is the card inside:


I used the largest of my Nellen Snellen Doily Flower Multiframes to diecut the rosepink cardstock, and the matching plain circle (from the same dieset) to diecut the sentiment circle.  The sentiment is a retired Elzybells stamp.  And those tiny hearts just had to added!

Check out the button!  I used a new product called the Epiphany Button Studio which is for making your own buttons, ie: you buy the matching clear see-through buttons (in my case, I used 20mm buttons) and peel off the film to reveal a sticky side.  You slide your cardstock or designer paper into the Button maker, put the button on top (sticky-side down), then press the top of  the Button maker and it punches your cardstock/dp to the same size as the button, sticks the button to it and punches the centre holes.  Confused?  Well, here is a video from You Tube - I am a visual learner, so found this easier......  I tried to "embed" the video, but couldn't work it out, so I'll just have a link here for now and try to work it out later.  It really is a very easy product to use and great if you need a matching button, but don't have one in your stash.  Fat Cat's Card Corner have 2 sizes of the round buttons:  14mm and 20mm.


And there is even a flower button maker - this is next on my list of "must-haves".  The size is 20mm.


You-Tube video of how to use the Epiphany Button Studio button-maker


Here is a close-up of my button.  I used the same rosepink cardstock to make my button and threaded some pink and white twine through then popped it up on 2mm mounts (dimensionals).


Phew - that was a long post!!  Thanks for stopping by!

Jocelyn


Card Recipe:

Stamps:  Stampendous Star Lilies CRP115 foam-mounted cling rubber
              Happy Mother's Day sentiment - from Kaisercraft CS916 Occasions clear set of 3
              Beautiful Day - Elzybells 03-252 (retired)

Ink:  Memento Tuxedo black

Designer paper:  Daisy d's Sweet Baby Jane Collection - Sleepy time

Accessories:  Cuttlebug, Nellie Snellen dies: Doily Flower MFD020 and Border 2 MFD023, Cuttlebug Jamara embossing folder, Scor-Pal, Bow Easy, grosgrain ribbon, pink/white twine, OMS, Derwent Coloursoft and Prismacolor pencils, paper stumps, 2mm mounts, Kaisercolour chalk, Stampendous Fun Flock - Lemonade yellow, Designer Dries clear adhesive (for the flock), Epiphany Button Studio 20mm, Button Studio clear round buttons 20mm, cardstock: rosepink, KW Doggett "Knight" white

Punches:  Stampin' Up corner punch, EK Success Arrows border punch

Sunday, January 9, 2011

Some flowers in my garden........

Cerinthe Major Purpurascens aka Blue Honeywort, Blue Waxflower or Blue Shrimp Plant


Hi, and thanks for visiting my Blog :-)

One of my other passions is taking botanical photographs, so I thought I would share some of my garden photos from time to time.

The first photo above is a plant called Blue Honeywort that I grew from seed and it has been flowering for many months.

This second photo is of my Wallflowers - taken from a few months ago - which was grown with a cutting from my late Father's garden - Dad was a keen gardener, so this plant has special significance to me.  Sorry I don't know the variety, but it is absolutely spectacular with the shades of purple, lilac and mustard yellow - and the bees absolutely LOVE it!!

Wallflowers - Erysimum

And the last photo below, are some of my anemones (there are freesias in the background) that I grew in Spring.  Aren't these colours just amazing!!  This is also a flower that my late father loved to plant in his garden. 

Double and single Anemones

Thanks again for stopping by!  Back tomorrow with a new card!

Jocelyn

Thursday, January 6, 2011

Penny Black: It's for you and Nellie Snellen Doily Flower Multiframes


Hi and thanks for visiting my Blog :-)

I couldn't help myself - I had so much fun making my last Circle card, that I made another - except this one I made a top-opening card instead of a side-opening - and of course, it's a Valentine's card!  You can see my first circle card on my post HERE along with the instructions of how to make one. 

This very sweet and totally adorable puss is another Penny Black stamp (you know how much I LOVE my PB's), except that I didn't ink up the envelope portion of the stamp which is on the far left.

Image copyright Penny Black Stamps


I coloured the image with OMS and Derwent Coloursoft pencils, then lightly chalked around the image with blue Kaisercolour chalk, then added some pink I-Kandee Pealescent chalk here and there, and on the card that the cat is holding as well as some red Stickles to the hearts.

The lacey white cardstock was diecut with my Cuttlebug and NEW Nellie Snellen Doily Flower Multiframes (which also contain plain matching circle dies) - I used the biggest doily one on my card - and the image was diecut using one of the matching circles.   The Multiframes are available now at Fat Cat's Card Corner.  The pink cardstock was diecut using one of my Spellbinder Circle Nesties.

Did you notice the embossed texture on the red and pink cardstock?  I ran them both through my Cuttlebug using the Textile embossing folder.  I love how it adds some "lacey-ness" to the card to match the Doily Flower diecut.

The bow was made with my Bow Easy to which I glued a heart brad after cutting off the prongs (much easier than poking a hole to thread the prongs through!).

Now here is a photo of the same card, but with slight differences.  Can you spot them?  No?


Well, I wouldn't expect you to notice, but I ran the white cardstock Flower Lace Doily diecut through my Cuttlebug using the Textile embossing folder instead of the pink cardstock - I just wanted to see what it would look like to have the Lace Doily diecut embossed.  The other difference is that I sewed on a red heart to the ribbon - I couldn't find my red heart buttons when I made the first card (you know how us cardmakers lose stuff on our desk LOL.......!).  I'm not sure which card version I prefer - I like them both!

And here is a pic of both the card insides.  I added some tiny red hearts which are the leftover punchies from using my Arrows Border punch - I added red Stickles to them as well.    The first photo inside matches the first card, and the 2nd photo matches the 2nd card:


Challenges:

I am entering this card into the Penny Black at Allsorts January Challenge of "All you need is love" and they want to see your interpretation of that famous Beatles song.

And the Papertake Weekly Challenge where the first challenge of every month from now on will be "Anything Goes" plus an optional "extra" something  - and this particular Challenge has the optional extra of "Lace" which can be paper lace or fabric - but you don't have to have Lace if you don't want to. 


Thanks again for stopping by!  Thankfully, I seem to have sorted out my computer woes which had my computer in a constant state of re-booting after upgrading a program which corrupted - not fun :-(   Thank goodness for the 'System Restore' feature in Windows XP!!  Takes so much time to "fix" a computer when I would rather be cardmaking!!  Hope to see you again soon!

Jocelyn


Card Recipe:

Stamps:  Penny Black "It's from you" PB-2859J wood-mounted, Sentiment: from Wendy Irving Expressions J6412.02 clear set

Ink:  Memento Tuxedo black

Accessories:  Cuttlebug, Nellie Snellen Doily Flower Multiframes MFD020, Spellbinder Circle Nestabilities, Cuttlebug Textile embossing folder, Odourless Mineral Spirits (OMS), Derwent Coloursoft pencils, paper stumps, Christmas red stickles, Kaisercolour blue chalk, I-Kan-dee Pearlescent chalk, ribbon, Bow Easy, heart brad/button, Cardstock: soft red, pink, KW Doggett "Knight" white

Punches:  EK Success Arrows border

Monday, January 3, 2011

Penny Black dog with rose and NEW Nellie Snellen Doily Flower Multiframes


Hi and a HAPPY NEW YEAR to you all!  Did you make any New Year Resolutions?  I made one - and that is to "do the insides of my cards before I move onto the next card"!!  Are you like me, and once you do the front of the card, you leave the inside for "later on"?   And, then I often seem to smudge the inside sentiment because I am in such a hurry, or I stamp it upside down or crookedly!   UGGH!!   I hadn't done any of the insides of my Christmas cards last year so I had this last-minute rush to do them - but not this year - and so far, with the cards I have made (even though they are not Christmas cards), I have done the insides! Yay me!

Anyway, I am so happy that you stopped by, because I have some gorgeous new Nellie Snellen Flower Multiframe dies to show you.  You can find them HERE at Fat Cat's Card Corner.  Aren't they just so pretty?  Just like a lace doily.  There are 3 lacey dies and 3 matching plain circles in the set.  You use the same sandwich in your Cuttlebug as for Spellbinder Nestabilities, ie: A Plate, C Plate, Die face up, cardstock, B Plate. 

For my card, I decided to make a Circle Card using my Spellbinder Large Circle Nesties.  You simple fold a piece of cardstock in half, and line up the Circle Nestie just near the fold of the card - see this pic:


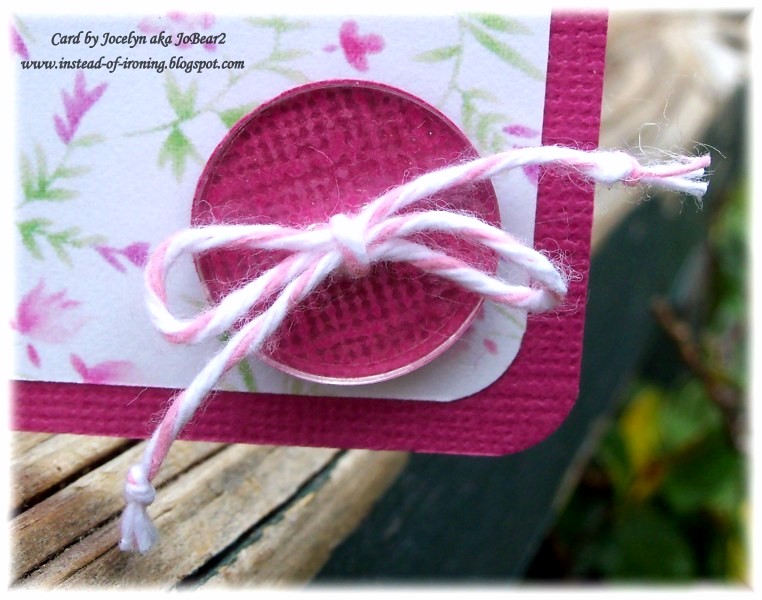
And run it through your Cuttlebug using the usual A, C and B plate combo for Spellbinder dies - and yes, it DOES cut through the 2 layers of cardstock - it's just regular cardstock - nothing special - but you should always check your own machine and NEVER EVER force a sandwich through if it feels very tight.  Here is an extra-close-up piccy:


Hey, I just realised the background looks like a swimming pool full of water!  But it's just my glass-topped table on our decking.  I had to take the photo there because it was over 40degC outside (about 104degF) with a blistering hot north wind, so I couldn't take my photos in my usual place because my Nestie/cardstock would have blown away!

You can diecut any shaped card with your Dies - and it's really nice to make something different other than a square or rectangle-shaped card.  Go on - have a play!!

This cute little dog is from a Penny Black Clear Set called "Critter Party" and was coloured with Derwent Coloursoft Pencils and OMS.   I chalked the blue sky background and added some pink Pearlescent I-Kan-dee chalk here and there - which isn't picked up by the camera but adds a gorgeous shimmer and is so pretty IRL.   The sentiment is from a retired Elzybells Spring Cubes clear set and I added a tiny pink rhinestone either side of it.  I added some Cotton Candy Stickles to the rose and the dog's cheeks, plus the tiny pink hearts which are the leftover punchies from using my Arrows Border punch.  This panel was diecut with the circle die from the Multiframes set, and the pink circle was diecut with my Spellbinder Circle Nesties.

The bow was made with my Bow Easy - which Fat Cat's now have in stock.  Lastly, I sewed on the button, then glued the ribbon to the card using Fabric glue.

Are you ready for a pic of the inside?  Yes, I really did the inside of the card!


This sentiment is another retired Elzybells rubber stamp - wish Elzybells was still around :-(

Thanks for stopping by!   Have you made any New Year Crafting/Cardmaking Resolutions?  Drop me a comment - I'd love to hear from you!

I'll be back when I can with another card - being Summer holidays here, my posting will not be as regular plus I am having some computer issues whilst I have been upgrading my computer which is eating into my free-time (very frustrating!!).   Hope to see you again soon!

Jocelyn


Card Recipe:

Stamps:  Dog with rose - Penny Black "Critter Party" clear set 
              Sentiment (card front):  Elzybells Spring Cubes 20-015-CC clear set
              Sentiment (card inside):  Elzybells "A beautiful day" rubber stamp

Ink:  Memento Tuxedo black

Accessories:  Cuttlebug, Spellbinder Circle Nestabilities, Nellie Snellen Doily Flower Multiframes MFD020, Derwent Coloursoft pencils, OMS, paper stumps, Kaisercolour blue chalk, I-Kan-dee Pearlescent chalk, Cotton Candy (pink) Stickles, pink rhinestones, gingham ribbon, Bow Easy, heart button, pink sewing thread, Cardstock:  brown, pink, KW Doggett Knight White

Punches:  EK Success Arrows Border punch


Related Posts Plugin for WordPress, Blogger...