skip to main |
skip to sidebar
Hi blogging friends  If you read my last post, you will have seen 2 Christmas cards that I made using the newly released My Favorite Things Die-namics Photo Card frame die. Today, I am sharing another two cards which are very similar - the only differences being the dies and the colour of the glitter cardstock. I finally had some time in my craft room inbetween medical appointments to put the elements together. I must admit, I really LOVE the aqua glitter cardstock one - but I do love any colour that is in the aqua/turquoise range.
My first card uses the Memory Box Country Landscape die for the main panel. The top RHS snowflake is a Simon Says Stamp Kate's Snowflake die and the bottom LHS is a My Favorite Things Die-namics snowflake die from the Snowflake Trio set. I added an Ice Blue Rhinestone to the centres.
If you read my last post, you will have seen 2 Christmas cards that I made using the newly released My Favorite Things Die-namics Photo Card frame die. Today, I am sharing another two cards which are very similar - the only differences being the dies and the colour of the glitter cardstock. I finally had some time in my craft room inbetween medical appointments to put the elements together. I must admit, I really LOVE the aqua glitter cardstock one - but I do love any colour that is in the aqua/turquoise range.
My first card uses the Memory Box Country Landscape die for the main panel. The top RHS snowflake is a Simon Says Stamp Kate's Snowflake die and the bottom LHS is a My Favorite Things Die-namics snowflake die from the Snowflake Trio set. I added an Ice Blue Rhinestone to the centres.
The dry embossing is a Cuttlebug Kars Snowflake embossing folder which is RETIRED and virtually impossible to find online. You can substitute the Sizzix Dots embossing folder from their set: Christmas Words and Dots, Item #658285, which is readily available online. Here is a pic of the set:
And now, the gold glitter cardstock version:
For this version, I used the Cottage Cutz Winter Wonderland border die for the main panel and then added another layer of snow using a My Favorite Things Die-namics Snow Drifts die. Instead of adding white snowflakes, I decided to add gold glitter cardstock snowflakes instead. The gold glitter cardstock is a lot brighter and paler in real life - looks a little dark in the photo but is really hard to photograph glitter cardstock and find the right balance of showing some glitteriness yet not over-exposing the white portions in the process. You often end up with a lovely glittery frame and a washed out image! Wish my camera could see what I actually see with my eye - maybe that will happen one day with better technology (?).
For in-depth details on how I made the card, please see my post from a few days ago HERE where I shared my silver glitter cardstock and red glitter cardstock versions.
Challenges:
I am entering my card in the following challenges -
Christmas Cards All Year Round - November Challenge - Winter Wonderland - card must have a winter theme. Snow, snowflakes etc.
ABC Christmas Challenge - W for Winter Wishes
Splitcoaststampers - Fan Club November Christmas Challenge - Window In/Out - where you need to create a Christmas view either in through a window eg: Christmas tree, decorations or out through a window eg: snowy scene. Now technically I don't see a wintry scene out my window at Christmas but I have lots of friends and/or relatives in the UK, USA and Canada who tell me that all they see is snow - and these cards will be going to them. Please note that you have to be a (paid) Fan Club Member of SCS to be able to play these challenges.
Splitcoaststampers - Clean and Simple Challenge CAS247 - Inspired by Music. My cards are inspired by the song: Winter Wonderland - which I used to sing in my All Girls Group which I was part of for over 10 years before my loved one became ill. I am singing it now as I type this: "Sleigh bells ring, are you listening? In the lane, snow is glistening. A beautiful sight, we're happy tonight, walking in a Winter Wonderland." LOVE it - one of my favs! We would visit Nursing Homes/Hostels in the area where we live at Christmas-time and sing a huge range of Christmas songs which the residents really loved.
It was amazing to see how even the residents who could no longer communicate and would often appear to be asleep or just not looking at you nor appear interested, would have little finger or their foot tapping away at the beat of the music. We used to sing at school fetes, charity functions and local events but I used to love singing at the Nursing Homes the most. We would visit them at other times of the year too - and they appreciated so much that people would come to sing to them!
I can't believe it is only about a month to Christmas! Yikes! I had better high-tail it to my craft room and get cracking on some more cards!
Thanks for stopping by. Have a fab weekend.
Jocelyn
Card Recipe - Card No. 1:
Stamps and Ink: None
Designer paper: Aqua glitter cardstock
Accessories: My
Favorite Things Die-namics Photo Card Frame die + Snow Drifts die + Snowflake Trio die set, Simon Says Stamp Kate's Snowflake SSSD111309 die, Big Shot, Cuttlebug
Kars Snowflakes embossing folder (RETIRED), Kaisercraft Ice Blue SB774
rhinestones, doublesided tape, cardstock - white (Paper Mill)
Card No. 2:
Stamps and Ink: None
Designer paper: Gold glitter cardstock
Accessories: My
Favorite Things Die-namics Photo Card Frame die + Snow Drifts die, Cottage Cutz Winter Wonderland border die, Impression Obsession Die100-F snowflake die set, Big Shot, Cuttlebug
Kars Snowflakes embossing folder (RETIRED), doublesided tape, cardstock - white (Paper Mill)
Hi blogging friends
I can't believe how quickly November is flying by: I am sure the year speeds up once November hits! It sure seems like it every year. I have been beavering away in my Craft Room in-between alot of medical appointments this month with my loved one. Thankfully, they are doing well even if their recovery is long and slow and challenging - and I am so grateful for the times that we can cherish together no matter whether we are travelling in peak-hour traffic coming home from hospital or just sitting for ages in a medical waiting room. Life is so fragile and you have to make the most of these moments together no matter where you are because you don't know what is around the corner.
The card I am sharing today is a clean and simple design based around a new My Favorite Things die called Photo Card Frame. When I first set my eyes on this die, I had all sorts of ideas running through my head. I think the main idea behind the die is to take a Christmas photograph of your family, pets or something Christmassy and pop it into the frame - but I had other ideas of using dies to make a simple scene within the frame - and here is the result:

I diecut the frame out of silver glitter cardstock then attached the diecut elements to that before attaching the finished frame to my card front. I used my Cottage Cutz Snow Swept border die for the main part of the scene and a My Favorite Things Snow Drifts die to add the extra layer of snow. None of the layers are up on dimensionals - they are just layered together with doublesided tape. Even though the Snow Swept border diecut looks like it is up on dimensionals, it just merely the dry embossing that it is on top of that bumps it up a little to look that way. The snowflakes are by Impression Obsession. I glued down just the snowflake centres and bent the tips up a little to add a little dimension to them and added a silver rhinestone to the centre.
I ran my white cardstock card front through my Big Shot using the (retired) Cuttlebug Kars Snowflake embossing folder. If you do not have this folder - plus it is virtually impossible to find online - you can substitute the Sizzix Dots embossing folder from the set Merry Christmas Words and Dots Item #658285 which is readily available. You can see a little pic of it here:
Once I had embossed my card front, I attached the scene/frame then just trimmed up the edges of the white cardstock base so that I had a thin border around the silver frame although the angle of the photo makes it look a little uneven. My white card bases are bigger than a Cuttlebug embossing folder which means I can just have the dry embossing within the scene and not spill over onto the cards edges.
While I was on a roll, I made another scene, this time using red glitter cardstock:
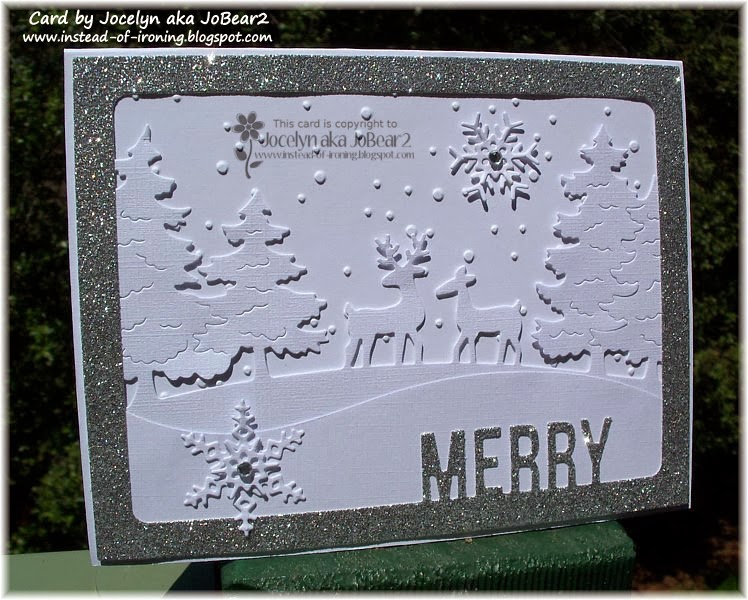
Again, I used the same embossing folder for the background snow - just a different die for the scene which in this case, is the Memory Box Deer Trio die. The top right-hand snowflake is by Simon Says Stamp: Kate's Snowflake and the bottom left-hand snowflake is the smallest of the 3 dies in the My Favorite Things Die-namics Snowflake Trio set. Again, I glued down the snowflake centres and bent the points up a little and added a red rhinestone to each centre. The white cardstock base edges (again!) look uneven in the photo but they are perfectly even in real life: just the angle of the photo trying to capture a little of the red glitteriness plus the embossing which make it look a little weird.
I can see myself using this Photo Frame die ALOT - and you could even just cut off the words if you didn't want them and stamp a different Christmas sentiment - or use the frame for another occasion. Yep, one of those really useful dies which I will definitely get my money's worth out of.
I have a couple of other scenes in the pipelines - watch this space!
Challenges:
I am entering my cards in the following challenges -
Christmas Card Weekly Challenges (by Sparkle Creations) - Challenge #51 - Sparkle and Bling. My sparkle and bling is the glitter cardstock and rhinestones.
Totally Papercrafts Friday Challenge #193 - Clean and Simple
Splitcoaststampers Fan Club Christmas Card November Challenge - Window In/Out into Christmas. Create a window scene at Christmas time eg: something you see when you look out your window at Christmas such a snow covered trees, snowmen, streets lined with snow - or when you are looking inside a window such as table decorations, tree, presents. Now of course, being Australian, we don't have snow at Christmas-time because it is summer so I am not looking out my window at snowy scenes but I have friends and/or relatives in Canada, USA and the UK and I send them cards depicting their snowy winters - so my card depicts what THEY see out their window instead LOL! Please note you have to be a (paid) Fan Club Member of SCS to be able to play in these challenges.
Thanks for stopping by! Hope to see you again soon.
Jocelyn
Card Recipe - Card No. 1:
Stamps and Ink: None
Designer paper: Silver glitter cardstock
Accessories: My Favorite Things Die-namics Photo Card Frame die + Snow Drifts die, Impression Obsession Die100-F snowflake die set, Cottage Cutz Snow Swept Border die, Big Shot, Cuttlebug Kars Snowflakes embossing folder (RETIRED), Kaisercraft silver SB700 rhinestones, doublesided tape, cardstock - white (Paper Mill)
Card No. 2:
Stamps and Ink: None
Designer paper: Red glitter cardstock
Accessories: My Favorite Things Die-namics Photo Card Frame die + Snowflake Trio set (smallest snowflake die), Memory Box Deer Trio die, Simon Says Stamp Kate's Snowflake SSSD111309 die, Big Shot, Cuttlebug Kars Snowflake embossing folder (RETIRED), Kaisercraft red SB711 rhinestones, doublesided tape, cardstock - white (Paper Mill)
Hi blogging friends
Happy Wednesday! Today I am sharing a birthday card that I made for my daughter's teacher who is a cat-lover so of course, I had to pick some Penny Black cats to celebrate the occasion:
I coloured the image with Tombow pens and a paintbrush. Of course, now that I love Tombow Pens, I want a whole set of 96 - but I'll just pick them up a few at a time to slowly build my collection. I added some Kindyglitz Crystalina glitter glue to the envelope, flower petal, dots and ribbon on the present plus all the cat's cheeks. I chalked around the image with blue chalk.
The designer paper is from the Echo Park Hello Summer pad - so PRETTY - and I wish I had bought more because I can't seem to find it anywhere in Australia! The yellow layer under the image is also from the same pad. You can buy the digital version of these Echo Park papers HERE at Jessica Sprague's website. I happened to stumble across Jessica Sprague's website one day when I was searching for some retired Echo Park papers and discovered that not only can you buy the digital versions but there is a greater variety within each range that you would normally buy in a pad - plus they have digital papers from many brands such as Carta Bella, Bo Bunny, Basic Grey, Fancy Pants etc. etc. Personally, I haven't bought anything from this website because I keep forgetting about it LOL!
The cardstock base has a 1/8" border made by my Perfect Layers Tools.
The sentiment is from the Penny Black clear set Sweet Wishes. I added some punched hearts using some pink paper from the same pad (they are the leftover punchies after using my Valentines Heart edge punch and were the perfect size). I popped the sentiment up on dimensionals.
Here is a close-up of the image:
The ribbon was attached in 2 separate elements and the bow itself was made with my Bow Easy. I added Fray Stop to the cut ends to stop them from fraying.
I diecut some flowers from the same designer paper pad but just couldn't figure out where to put them: they just looked too "busy" because I already had the sentiment popped on. I always seem to get brain-freeze when it comes to embellishing my cards - so I just kept this one simple which is pretty-much my usual style.
Finished size is 6 inches x 6 inches or 15cm x 15cm.
Challenges:
I am entering my card in the following challenges -
The Squirrel and the Fox Challenge #56 - Animal Antics
Papertake Weekly Challenge - Anything Goes
Thanks for stopping by!
Jocelyn
Card Recipe:
Stamps: Penny Black The Essentials 3833K wood-mount, Sentiment from Penny Black clear set Sweet Wishes 30-104
Ink: Ranger Jet Black Archival
Designer Paper: Echo Park Hello Summer 6" x 6" pad
Accessories: 140lb watercolour paper, Lifestyle Doily Rectangle + Rectangle Dies, Big Shot, Kindyglitz Crystalina glitter glue, dimensionals, Tombow pens, paint-brush, Kaisercolour blue chalk, silver-edged light blue organza ribbon, Fray Stop, Bow Easy, Perfect Layers Tools, cardstock - light blue
Punches: Martha Stewart Valentine Heart edge


.jpg)


